

Last week an indie dev contacted me. He is making a D&D map making tool. He has procedural room generation working, but decorating the rooms is proving complex. He enjoyed our previous video Update #110 Procedurally Decorate a Dungeon Room With Unity & C# but would like more specifics.
Knowing this is probably secret sauce stuff, he offered money or time swap for our code. And he’s right: It took a team of three about 17 months to pull it off.
I’ve decided to respond by writing this article and sharing this knowledge with you, for reasons that will soon become clear.
Rooms are easy, Decorating is Hard!
I never wanted to procedurally generated 3D dungeon rooms.
I tried everything I could to do what we needed in 2D. Exhausted and despondent, I reluctantly stepped into 3D. The most reluctant convert in all of England. 😊
The two primary reasons for this switch were:
Art cost – the inability to use a door, barrel, chest from different angles was killing me. A 3D camera solved all perspective issues.
Samey rooms – The procedural de facto term seems to be “10,000 bowls of oatmeal”. That’s a mouthful to say or type, so I use the term samey to mean there isn’t enough variety or distinctiveness across multiple generations. A dungeon where each room is similar to the last is boring because it is samey.
The reason I didn’t want to do it is because no one else has.
Meaning, this is going to be hard.
Hard means it will take a lot of time, money, and effort.
With all other options exhausted, I gritted my teeth and set out to innovate.
Because I’m a cheap programmer, I want to make AI not hire level designers!
Before I do anything, I like to research what others have done. Maybe I’ll find exactly how to do it. Maybe I’ll get inspired. Maybe, I’ll learn what not to do. If I’m out to create a lightbulb, knowing what filaments not to use helps as well.

I came across this indie dev article on random dungeon generation written in 2013. Whoever was blogging about game dev stopped just a few posts after this one. Little did he know, six years later he’d inspire me and be the impetus to our 3D dungeons. His freely shared musings is what leads me to take the time to write this article before you.
The 3 Standard Ways To Do Procedural Dungeon/Room Generation
1. Chunks (Set pieces)

This is how Bethesda approaches Skyrim and Fallout. Some artist or level designer creates a chunk of level geometry. It is sized well to allow player movement, may have nav meshes for enemy AI, and is designed to some kind of grid so it matches up with others. Most importantly, it looks nice. A human takes the time to design the piece: put in a table, chairs, candles, plates, and spider webs. The fully formed chunk is then dropped into the level aligned to some kind of grid: either at design time (Bethesda) or at runtime (Blizzard).
Clarification: Bethesda starts with chunks but then the level designer will adjust as they desire, much like Unity’s scene mode where you can freely adjust every piece. It is combinational as opposed to procedural, but their procedural tools help the level designer work quickly. In the end, the level geometry is always the same.
This is the easiest, most straight forward approach. There are many resources available on this approach, like the Unity Asset DunGen, because it is the most common and straight forward. The results are great and immediate. Everything looks nice right away.
But this results in samey dungeons. No matter how many chunks you have in your library, the player will see them again and again. Also, the quality of your dungeon will vary by the depth of your library. And a deep library costs $$$.
2. Chucks with Tiles (Set pieces with glue)

I love Blizzard’s Diablo III and have enjoyed hundreds of hours with it. I don’t have access to their code, but I’m pretty confident I understand how they make their dungeons (and outdoor areas).
Artists create chunks just like above, but instead of a person placing them at design time, they are placed at runtime by algorithm. But, these chunks may not line up or be close to each other. So tiles of floor & wall are used to glue the pieces together. This way a room can be off of a 3 tile wide hallway, or 4 tile wide, or 5 tile wide, and it just works. The algorithm is filling in the seams.
Example maps across multiple plays:


Clarification: It is not possible to tell if an algorithm is placing individual tiles or smaller chunks of hallway which are 4 wide, 5 wide, etc. I’m giving Blizzard the benefit of the doubt they went the harder way.

For a 3rd person action game like Diablo III with a pulled back camera, does it really matter if there are only a few kinds of bookstacks or tables & chairs? Even if you see it 20 times across a playthrough, do you care? Probably not! It’s what is in the rooms (monsters, loot) the game is focused on. Diablo isn’t about exploration the way a Bethesda game is, it’s really just a matter of “which direction is the loot?”
3. Pieces (or Tiles)

If fully formed chunks results in samey dungeons, clearly the answer is to go smaller! Instead of a 6x6 chunk with some rubble, let’s make 1x1 pieces with or without rubble (chunk approach again) or procedurally place rubble or a barrel on it. This is how real RPG tabletop terrain does it, like Hirst Arts or DwarvenForge.
It is also what the ant ranch article which inspired me is about.
Determine a room size, say 8x4 tiles
Draw the perimeter: tile by tile, putting in corners as needed. Decorate the individual tile as you place it: A wall may have a torch, sconce, or window.
Fill in the center with floor
Now decorate by putting stuff on the empty floor spots.

Step 4 can get rather complicated: if a table is 3x2 and the room is empty, that’s pretty easy. But once you’ve placed one item, every additional item must do collision detection so you don’t have a table going straight into a wardrobe.
It gets even worse when you take vertical placement into consideration. If the wall has a torch coming out of it, can you put a wardrobe in front of it? Nope! What about a painting. No one would put a wardrobe in front of a painting… unless they were hiding it!
I use the last as an example of a bug that may be a feature in doing this kind of work. It seems wrong but may be ok. There are lots of surprises in procedural and the lines of what is right/wrong start to blur.
There is a problem in the 4 step algorithm above when it comes to wall placements, did you catch it?
If you are going 1 tile at a time, and only considering 1 tile sized modifications (torches, sconces, barrels) you can’t place anything larger than 1 tile. Yes, you can use state to remember you started placing a 2 tile wide painting on the wall, but you don’t actually know what the next tile is until you get there. It could be a corner and now your painting goes through the wall.
These sorts of problems are not insurmountable, it simply illustrates how procedural generation requires multi-pass algorithms. Make the first most important decisions up front, then get finer and finer detail as you go using the state of previous passes to constrain what you can do right now.
Having built all 4 of the methods described here, I consider the tile method superior. But, of course, that isn’t what I did. 😊
If and when I make Archmage Rises 2, it will be fully 3D tiles to represent the whole world.
Just like one of my favorite games: Final Fantasy Tactics. 😊

Approach 4: The New Builder Method

As I write this, construction workers are working on an addition to my house. Our algorithm is similar to what they are doing in the real world, so I’ll call it the Builder Method. Let’s see if that catches on. :-)
To avoid the sameyness of the chunk approach, and to avoid the 1x1 difficulties of the tile approach, I went in a completely different direction: I’ll build the room geometry entirely from scratch.
Clarification: This method works in my game because the player moves from room to room, like in D&D verbally going from encounter to encounter. The player cannot see outside of the current room. This is very different from Diablo III where the transition from one room to another must be visible.
Room geometry is defined by float values for width, length, and height. Our room size is decoupled from any piece or tile size constraints. Big win for flexibility. I can have a tiny room with a super high ceiling, a tower perhaps, or a long wide room with low ceiling for a foreboding prison area.
Begin with the End in Mind
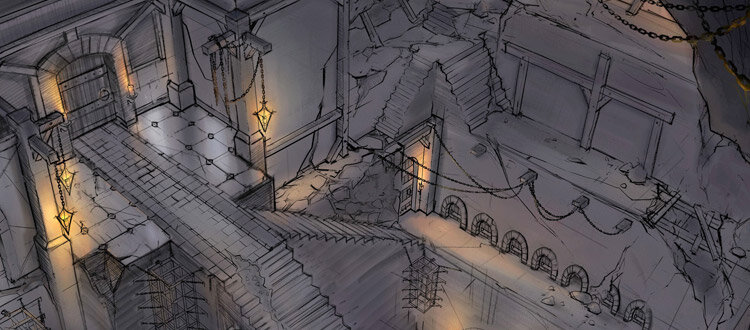
While a great philosophy for life, it is even more important for procedural generation. I hired a 3D artist to design up some sample rooms for us, using the assets we have, so we have something for the programmers to shoot for. Here is an example.

How We Do it
We are using C# with Unity 2020.3. We use the scriptable part of ProBuilder (including some undocumented hacks) to create geometry from code.

When the player enters a room we only know a few basics:
the primary race that lives there, like spiders or goblins. This affects the kinds of decorations allowed to be present
the age of the lair, which defines for us the materials which were used to create the structure. Are the floors wood, tile, or rough hewn stone? We found a small palette of materials creates consistency across rooms improving the feel.
the room’s purpose: is it a bedroom, barracks, dining hall, treasure vault? We wrote different decorator subclasses for each room type as they vary greatly
We generate the 4 wall surfaces, ceiling, and floor as 1 unit thick rectangles which we then texture appropriately.
Finally, we also define the room size mins/maxs. A prison cell should be small, a dining hall should be large, so we tell the generator what values to use based on purpose. The player doesn’t see anything than the current room, so we don’t have to worry about rooms being too large or small to actually fit with their neighbors. They are connected by logical nodes, not actual brick and mortar.
Now it’s time to decorate the room with props.

No Grid? No Problem!
We have hundreds of 3d objects (props) which can be placed in a room, but we need a way to know which ones should be placed in THIS room. We take a recipe & ingredient approach through a tagging database.
Every 3d object available to the game has a series of tags defining its characteristics. We use one level of indirection to keep things simple and organized.

A simple bed has a tag of “sleeping”.
A 4-poster bed has a tag of “sleeping” but also the tag of “ornate”.
A bedroom is allowed to decorate with objects tagged as “sleeping”
A barracks also decorates with “sleeping” but is not allowed the “ornate” tag.
The simple bed could appear in a bedroom or a barracks, but the 4-poster bed could only appear in a bedroom.
This simple indirection keeps our room definitions tight and rarely ever need to change.
The library of available objects can grow at any time (updates, DLC) and the main decorating code never needs to change.
Each prop has a collider on it so we know how big it is at runtime, no need for anyone to waste time typing in values.
Recipes for Decorating
Each room type defines a “recipe” of what is important (major) and what is nice to have (minor).
Major tags will be attempted to be placed first, while minor tags are meant to fill in the cracks.
It’s hard to convince a player they are in a bedroom if there is no bed.
Equally difficult is a convincing kitchen if there is no cooking hearth.

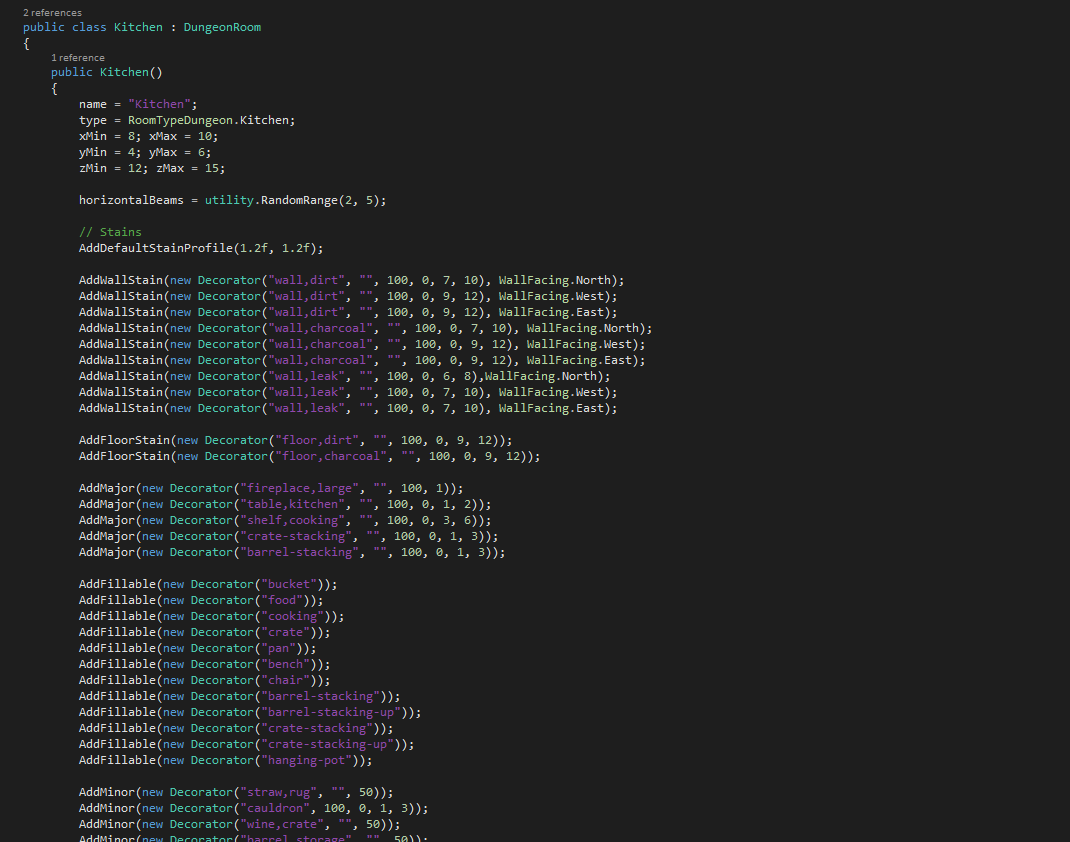
Overloads on our Decorator constructor enable definitions from the basic to the complex:
Decorator(string _noun, int _chance, int _must = 0, int _min = 0, int _max = 0)Decorator(“sack”, 50) means there is a 50% chance of placing a sack type item in the room.
A more complex one can define a window must be placed, and up to 3 of them may be placed.
How did we come up with the ranges? Lots of generating and testing, until we got something that felt right.
You can also request tags to be used as part of wall decorations or as clutter/fillable tags (explained later).
The requests in a recipe don’t have to be all declarative either. Perhaps you want a desk in the bedroom, but you don’t want to use the one specifically designed for the study so you use a “desk” && !”study” style query.
There are a couple of other options you can specify to request that the prop is centered in the room (like a fountain) or should be placed against the wall (bookshelf).
The Decorating Algorithm
With the specified recipe it tries to find assets to match the tag queries within it: starting with the major items and working down into the minors. Unless there’s specific constraints on a tag (like for center-pieces or edge pieces), we just randomly look for an available spot.
Keeping it super random helps to add variety and avoid similar looking rooms. So that we don’t have to actually place/destroy all these objects as we’re generating rooms, we’re not actually importing the 3D assets at this point, just marking out where in the room they’ll go and tracking the space they’ll likely occupy (removing that from future consideration for other props). Once all the props have been placed (or we run out of space), we assign a numerical rank to the room to measure how well it matches the room recipe and go through another 10-15 attempts and pick the best room. Our final candidates actually spawn the assets in and do last-pass checks with raycasts to make sure that all doors or interactable objects are visible from the camera (so that we don’t create unplayable dungeons).
Decorating Decorations (Fillables)
As discussed above, it is easy for an artist to create a singular “piece” of a table with chairs, plates, goblets, etc. But they always look the same. Either the artist makes hundreds of variations (then quit out of boredom), or we need to code up a way to decorate a table with chairs, candles, wine bottles, goblets, cutlery, etc.
We wanted a prop to be able to fill itself with items allowed by the room. Algorithmically there is no difference between filling a shelf in a library with books, a shelf in a kitchen with vegetables, or a shelf in an alchemy lab with bottles. But it makes a big difference in “selling” the story of the room. We call these decorative clutter items “fillables”.

The inspiration for this was The Sims. When you buy a table or shelf, you may only place items at specific “anchors”. Chairs can only be placed next to the table at specific anchors. We took this idea of anchors and ran with it for tables, shelves, and bookcases.
A fillable prop knows where its anchor points are. It knows how to fill itself with stuff.
Let’s look at a simple case like a table with surrounding chairs and a couple of mugs.
The room would request a “table”.
The table would then request “chairs” and “plates” which would be supplied by the room.
The table loops through it’s anchor points deciding which ones to fill
If filling the anchor, the item is positioned to the center of the anchor (fillables range in size)
Then the most important step: we fudge the location by about 20%.
We found 20% provides enough variety without going outside of the bounds of the anchor. It eliminates sameyness. Sometimes things are cleanly organized, sometimes thrown around haphazard. Most importantly, it looks real.
Each request might also have a density range. So a tavern table with a bunch of mugs on it might have a density between 20-30% and so while there might be 20 or so positions where mugs could be, maybe only 4-6 spots are actually used. This sort of flexibility allows us to arrange the assets at a micro level to tell a certain story, while still allowing things to be randomly moved/rotated/missing for additional variety.
Turtles all the way down!

It wasn’t much of a leap to make a fillable have children of its own.
This recursion was used for stacks of barrels or bookshelves or wine casks to dynamically fill walls. It also allowed us to position larger set pieces like a fire place could have nice chairs positioned facing towards the flame, but those chairs could then have end-tables next to them, which could have books ontop of them, etc. And all these items that fill up slots get specified at the room level as clutter/fillables. So in most rooms, you might have books or candles on top of a table, but in a study you might have a globe or in a alchemy room you could have potion vials or in a burial chamber you might have a skull.
Closing Thoughts

Every item on every shelf is procedurally placed.
That about wraps up how we did it. Happy to clarify or further explain anything here, just leave a comment below.
Here are some final notes from Michel, the programmer who wrestled with all this dungeon decorating code the most:
Collision prediction is super annoying: converting between multiple coordinate systems drove me insane trying to figure out if a nested room feature would collide with something
Make sure you pay attention to your debug tools: visualization tools of what portions of the room were already claimed were great at tracking down issues, but there’s no replacement for very detailed logs that explain why a certain prop isn’t being placed
Using Unity’s visual editor is great for monkeying around with how much rotation a chair should be allowed, trying to guess at the right numbers in the code is a nightmare. Make sure you use the tools the way they’re meant to be used rather than having to rely on what was easiest to get up and running first